Description
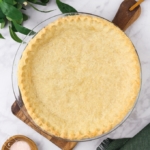
A buttery and flakey low carb pie crust that you can actually roll out with a rolling pin. This dough bakes just like a real pie crust dough, and the entire pie crust is only 3 G net Carbs!
Ingredients
1/2 Cup Butter, Cold [1 stick] (this will be cut into 30-40 small cubes and chilled!)
3 Tablespoons Oat Fiber (Lifesource Brand or Honeyville Brand HIGHLY recommended here!)
3 Tablespoons Vital Wheat Gluten
4 Tablespoons Resistant Wheat Starch
4 Tablespoons Wheat Protein Isolate 8000
1 Tablespoon Wheat Protein Isolate 5000 (OR Wheat Protein Isolate 5500)
2 Tablespoons Whey Protein Isolate, Unflavored (I like ISOPURE)
½ teaspoon Xantham Gum
1.5 Tablespoons Inulin (OR sub 2 teaspoons of sweetener of choice)
1Tablespoon Erythritol (OR sweetener of choice)
¼ teaspoon of Salt
6 – 7.5 Tablespoons Ice Water (must be ICED) – see post for details as to why iced is important!
Instructions
1.) Cut your Stick (1/2 Cup) of butter into small cubes (aim for about 30-40 smaller cubes) and then quickly place cubed butter into the freezer (just while we work on the rest of the recipe – no more than 10 mins). NOTES: DON’T leave your butter on the counter while we mix up the flours, and don’t leave it in the freezer for TOO long either ????! See Post for details as to WHY we want it cold, but not frozen 🙂
2.) Mix all dry ingredients together in a food Processor (PREFERRED), a stand mixer, or a Bowl (if using a pastry cutter!). If using a Food Processor, then pulse just to evenly to combine dry ingredients. IF using stand mixer, then mix on lowest speed for just a few seconds to mix. Otherwise, just place in a bowl and use a whisk to combine.
3.) Drop your COLD cubed butter into the dry ingredients and pulse on and off for 10-15 seconds in your food processor until butter cubes are coated with flour and resembe the size of a pea down to half the size of a PEA (this is important! Too big of chunks yields holes in your pie crust, but no butter chunks at all leave your pie crust ‘tougher’ rather than flakey).
*If using a stand mixer, then mix with the paddle on lowest speed, in short bursts, just until butter cubes are coated with flour and just slightly bashed by the paddle (10-20 seconds total ish and butter chunks about pea sized).
*If using a pastry cutter, then cut/gently mash butter into flour until coated with flour (but still chunky, with all butter chunks being slightly smaller than pea sized!).
4.)Working quickly, add 6 Tablespoons ICE water into food processor and pulse for a few seconds to check the dough. If needed add additional ice water (1/2 TBSP at a time) and continue to pulse until a very crumbly dough forms. You will know it’s ready and you’ve used just the right amount of water, when you can PINCH/gather the crumbly dough pieces together and they stick together to form a dough during pinching (PLEASE SEE PHOTO GUIDE IN POST)! You want your pie crust dough to have pretty small but visible (1/2 the size of a pea) butter chunks in it (not a smooth dough ball) too. Once your shaggy/crumbly dough has formed, gather up (touching as little as possible) and place onto seran wrap. Wrap tightly and press the dough together through the seran wrap to form a dough disc. If your dough was as suggested above (forms together when pinched), then you should be able to mold a SMOOTH round disc while in the seran wrap by lightly pressing together and sort of kneading with your hands. Refrigerate dough disc for at LEAST 30 minutes (up to 3 DAYS!) before moving on to rolling.
*If Using a Stand Mixer, then add the starting 6 Tablespoons of ice water, mix on lowest speed for 10-15 seconds, then check the dough to see if more ice water is needed, and follow instructions above.
*If using pastry cutter, then add 6 Tablespoons of Iced water and then cut/mash dough for 10-15 cuts, then check dough. Add more ice water if needed, following directions above. You may need to keep cutting/mashing the dough further with this method, until your dough resembles a crumbly but sticky dough (see photos in post!).
5.) Preheat oven to 350°F. Grease your pie pan with a light spray of avacado oil or cooking spray.
Note: you can place your greased pie pan in the fridge until you’re done rolling your dough ???? if you really want to overachieve, but it’s not required. This just makes sure your butter chunks are cold up until the second your dough goes into the oven, which results in flakier dough layers!
6.) Layout Two Pieces of parchment paper and dust with Oat Fiber (this will PREVENT sticking). If you have a silicon baking mat, it helps to put it underneath the bottom piece of parchment paper to keep it from slipping around when you roll (you can also use a lightly damp papertowel sheet under it instead!). Working quickly, place your chilled dough between your floured parchment papers. Roll out your dough into a circular shape about ¼ -1/3 inch thick (I like to roll mine in a clockwise fashion to help keep it in a circular shape). Flip your underlying parchment paper upside down onto your pie pan and your pie dough should come right off! Fold under the extra dough around the edges of your pie crust (it’s actually good when your pie crust edges are thicker than the rest of the crust!). If you want a fancy crimped edge, then use the thumb of one hand and your pointer and middle finger on other to pinch the dough as you travel around the edges , OR just gently fold then press the edges flat onto the pie pan (feel free to cut off any excess) for a plain crust edge for a simpler method. (EXTRA TIP: IF you’re making a GOOEY PIE and you want to minimize the risk of the center of the crust turning soggy, you can brush the crust with a little egg whites to crisp up the base more when pre-baking. I didn’t feel this was needed even in a pecan pie, but I have done this for regular flour crusts before????♀️ ).
Optional : add Blind Baking Pie Weights to ensure this doesn’t puff up in the middle on top of crumpled parchment (See post for a link with how to do this).
7.) Bake for 12-20 minutes (time depending on your final pie recipe but generally, 12 minutes for a partially baked crust, 20 minutes for a fully baked pie crust). I recently pre-baked mine for 17 minutes before adding pumpkin pie filling and pecan pie filling). Allow crust to cool for 5-10 minutes before filling if continuing to bake.
8.) If you’re going to use this pie crust in a recipe with a very long bake time (longer than 30-40 minutes, you will want to add a pie crust shield or cover the crust with foil to prevent overbrowning). If you’re going to freeze this pie crust, you will want to do so BEFORE baking (see notes below).
Notes
*USING A PIE SHIELD: IF your total pie bake time (after pre-baking this crust) is longer than 30-40 minutes OR higher than 350F, I DO recommend you use a pie crust shield OR make one with foil to cover the crust edges of this pie. It started browning a little too much for me, right at the 40 minute mark @ 350F. This may vary slightly based on your oven, so you will want to watch it carefully in ANY recipe, and cover as soon as too much browning occurs for best results!
***If freezing pie crust to use later, then follow these instructions. First,spray your freezer safe pie pan tin with avacado oil (or grease it however you like) before flipping the rolled out pie crust dough into it. Shape the pie crust as you would like for your future pie, then put the whole uncooked pie crust into a freezer safe giant Ziploc bag. Flavor may alter slightly after being frozen for longer than 2 weeks. To use a frozen pie crust, just thaw pie crust IN THE REFRIGERATOR (NOT on the counter or it will melt the butter!), for 3-4 hours before pre-baking as in the above recipe, then filling the pie and baking as your recipe states. ????
- Prep Time: 40 minutes
- Cook Time: 20
Nutrition
- Serving Size: 1 Pie Crust
- Carbohydrates: 3 g net