Description
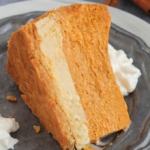
Move over Pumpkin Pie, this Keto Layered Pumpkin Cheesecake is going to steal the holiday dessert stage! With a lightly sweet brown butter almond flour crust and TWO layers of creamy NY Style Cheesecake coupled with Pumpkin Cheesecake (that TASTES LIKE PUMPKIN PIE), this dessert will surely fool any carb lover. It’s creamy, smooth, rich and sweet, and by golly it’s All sugar-free, gluten-free AND low carb. This is my forever Thanksgiving dessert.
Ingredients
For the Crust:
- 1.5 Cups Almond Flour (blanched and finely ground- I use Kirkland brand or Anthony’s)
- 6 Tablespoons Butter (salted)
- 4 Tablespoons Erythritol (granular) (or substitute with Monkfruit)
- Large pinch of salt
- Dash of cinnamon (optional)
Cheesecake Layer:
- 3 Packets of Full Fat Cream Cheese (24 oz), softened to room temp
- ¾ Cup + 2 Tablespoons Allulose (Or Substitute with Xylitol)
- 3 Tablespoons Erythritol (or sub with 4 more tablespoons of Allulose)
- 3 Large Eggs, Room Temperature *see Note 1 for quick trick
- ½ Cup Full Fat Sour Cream
- 1 + 1/2 teaspoon vanilla extract
For The Pumpkin Layer (Additions):
- 1 Cup + 1 Tablespoon Canned Pumpkin Puree (NOT pumpkin ‘pie filling’)
- Large Pinch of Salt
- 1/4 teaspoon vanilla extract
- 1 + 1/4 teaspoons pumpkin pie spice
- 3 Tablespoons Allulose (or sub xylitol)
An 8 Inch Spring-Form Pan
Instructions
- Preheat Oven To 350°F. Wrap your Springform Pan (I use an 8 inch Springform Pan) with heavy duty aluminum foil around the outsides so that no water will leak in , in a water bath! Please see note 2 below or read my post with details on how to do this, with additional options you can use! ***I like to wrap the outsides of my pan in foil to waterproof it, then put an oven-safe slow cooker liner under around the edges, tying it in a knot to keep it tight the outside of the pan, just below the top for EXTRA water leakage protecting. details of this method in note 2 below the recipe.
- Make Crust: First, Brown the Butter by Placing Butter into a pan and melt over medium heat. Once melted, allow the butter to continue cooking until it you see tiny brown bits in the pan bottom of the (or little golden brown bits bubbling in the center of the pan). Usually browning butter takes about 2-3 minutes for this to happen and it browns quickly, so keep an constant eye on it. You can ‘check’ for brown bits in the pan by swirling the pan around quickly and looking for golden brown specks. As soon you see some golden browning, then remove from heat ASAP. Drizzle all browned butter on top of the almond flour mix and stir in with a fork until evenly mixed. Spoon the mixture into well greased 8 Inch Springform pan. Press the crust into the bottom and up around the sides. Go up about 2 inches around the sides of the Spring form pan. (I like to use a measuring cup to press down the crust and also pushing it into the edges, which helps with even thickness as well). Use a knife to make the top edges of the crust going UP the sides of the pan even in height if you feel the need to make it extra pretty 😊 Bake in the oven for 8-12 minutes, watching closely. You want it golden but not BROWN. Remove from oven and allow to cool for 10 minutes while you make the filling. Turn the Oven Down to 325°F for the cheesecake.
- Make the Cheesecake Layer using items in “cheesecake ingredients”. First, Add the softened cream cheese, Allulose (¾ Cup + 2 Tablespoons), and the Erythritol (3 Tablespoons) to a mixing bowl and cream together with a stand-mixer or hand-mixer until smooth and fluffy. Add each egg, one at a time, mixing in between each until just smooth. Add Sour Cream and Vanilla Extract (1.5 teaspoons) and mix another 15 seconds , or until smooth (don’t overmix here though!). Scoop out 2 Cups of this cheesecake mixture and pour into your cooled almond flour crust. Smooth the top with a spatula. The rest of the cheesecake mix in the mixing bowl for the next step (making the pumpkin layer!).
- If you want to make a pretty white swirl design in the top of your pumpkin cheesecake, then set aside 3 Tablespoons of the cheesecake mix now in a small ziploc sandwich bag (or piping bag). Now, using the remaining cheesecake mix, we will make the pumpkin cheesecake layer! Add pumpkin puree, the remaining Allulose (3 tablespoons), 1/4 teaspoon vanilla, large pinch of salt, and the pumpkin pie spice to the cheesecake mix and mix on low just until smooth and uniform. Pour the pumpkin cheesecake mix on top of the plain cheesecake layer and smooth the top with a spatula. *If you set aside extra plain cheesecake in the ziploc bag (or piping bag) for a top design then squeeze it to one corner of the bag, snip the tip with some scissors and pipe in on to the top of the pumpkin cheesecake. I made a series of circles , largest near the outside edge to smaller in the center, and then used the tip of a toothpick to drag the white cheesecake from the center out towards the edge or you can do the the outside towards the center. Either way, Make it FUN!
- prepare hot water (or I just use piping hot water from my sink) to make your water bath. Gently place your Springform pan (lined with foil on the outside remember!) into a roasting pan or pan that will fit your springform into it. Pour hot water into the larger pan until it is about 1 inch deep. Place the Entire water bath with Springform pan in it, into your oven (now should be at 325F). Bake for 50-60 minutes, or until the edges start to slightly souffle up (puff) but the center (about 2 inch radius from the center) is still wobbling when jiggled (It will set as it cools). Turn off your oven, crack the oven door open, and allow the cheesecake to cool slowly in the oven with the oven off for 30-60 minutes. Remove from oven, and allow cheesecake pan to cool further on the counter (until cool to the touch), before refrigerating.
- Cover Spring Form Pan with Foil or Seran Wrap and Refridgerate for 4 hours (up to 5 days) before removing Springform sides and serving!
Notes
Note 1: If you forget to leave your eggs out with your cream cheese to come to room temperature, here’s a quick tip! simply set your cold eggs into a cup of warm water for 3 minutes! They will quickly warm to room temperature this way. 🙂
Note 2: You will absolutely need to protect your springform pan with foil on the oustside for water leaking in while baking in the waterbath. Here’s a my personal preferred method is to DOUBLE line my springform Pan with foil and THEN cover it with a crockpot liner tied tight around the outside (below the top) for EXTRA PROTECTION- You can view this method example HERE . Here is a video for another springform waterproofing strategy which works fantastic as well if you have the right sized pan, which includes a springform pan, in a slightly larger pan, set inside an even larger roasting pan with the water bath)!
Net Carbs = 4.91 grams Per serving (serving size = 1/12th of cheesecake AKA a BIG slice!)
*Sugar alcohols from erythritol or allulose not counted in the total net carbs, since they don’t affect blood sugar (they’re 0 net carbs)!
Carb counts vary based on the brands of each item used. My calculations are for the brands listed/suggested.
- Prep Time: 10 minutes
- Cook Time: 50-65 minutes
Nutrition
- Serving Size: 1/12th of Recipe
- Calories: 273
- Fat: 34.8 g
- Carbohydrates: 4.91 g net carbs
- Protein: 10 g