Description
A delicious & revolutionary Keto & GLUTEN-FREE Pasta made with lupin flour, so it’s packed with proteins and nutrients, SUPER easy to make, and only 5.2 g net carbs per serving (serving = 1/5th of the whole batch)! I’ve included 3 DIFFERENT methods you can use to make this pasta, in ANY SHAPE YOU WANT TO, along with instructions on how to dry & STORE your homemade pasta in your pantry for the future! PLEASE see the full post for all details and variations, and don’t miss the recipe video below (which shows how I make a few different shapes!).
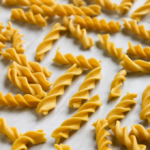
I’ve made with THIS pasta dough: fusili (easiest to make in large batches), tagliatelle, ravioli, spaghetti, lasagna noodles, elbow macaroni, rigatoni, bow-ties (aka farfalle), and pappardelle noodles…. with more options STILL!
Ingredients
*I’ve included the volume measurements here, but PLEASE, PLEASE, use a kitchen scale to weigh your ingredients INSTEAD! It’s vital to achieving the PERFECT dough (especially if you’re using a pasta press/extruder). If you don’t have one, buy a kitchen scale ASAP.
Ingredients:
- 150 grams (1 cup +3 Tablespoons) Lupin Flour (THIS LUPINA BRAND IS BEST!)
- 22 grams (3 Tablespoons) Tapioca Flour (I like Bob’s Red Mill Brand)
- 24 grams (3 Tablespoons) Blanched Almond Flour (Kirkland Brand or Anthony’s are BEST)
- 1 teaspoon Allulose (I like Anthony’s Allulose)
- 1/4 teaspoon + 2 pinches Salt (I like fine, pink Himalayan Sea Salt)
- 1/2 teaspoon Xantham Gum (optional: add 1/4 tsp more if handrolling pasta, *See NOTE 1*)
- 3 Large Eggs, room temperature (150 grams) *See NOTE 2
- Silicone Baking Mat
Shaping/Tool Options (PLEASE read full post above for more info!):
- KitchenAid Gourmet Pasta Press Attachment (this is what I used to make all my fusili/spiral noodles in photos)
- Pasta Manual Roller
- Marble Rolling Pin & Silicone Baking Mat (for hand rolling option)
- Stand-Up Pantry Food Storage Bags (the 6.7 x9.5 inch fits one dried pasta batch PERFECTLY)
- Fluted Pastry/Cutter
- A Pizza Cutter & XL ruler
Instructions
- Combine your lupin flour, tapioca flour, almond flour, allulose, salt, and xantham gum in a bowl. Whisk well to combine. Using your hand, make a small well in the center of the flour. Crack your room temperature eggs into the middle of the well. Using a fork, pop the yolks and whisk the eggs right in the little well of ‘flours’ . Slowly add a little bit of the flours surrounding the eggs while you continuing whisking. Keep adding more flours until our dough is thick, sticky, and is getting too stuck to your fork (the flours won’t be fully incorporated yet, and there should still be some dry flour around the edges of the bowl – that’s OKAY!). SEE RECIPE VIDEO below for help. Once it’s too thick for mixing with your fork, you can switch to using your HANDS! Knead the dough in your bowl, while incorporating the last bits of dry flours. Your dough SHOULD seem thick and a little dry, but keep at it, getting as much of the dry flour kneaded in as you can! I usually have a few little pieces of dry flours left at this point that are hard to incorporate while kneading IN the bowl. I find these bits are easier to incorporate once I transfer the dough to my counter (which is the next step).
- Once your dough has all, or nearly all, of the dry flours mixed in to it, you can switch to kneading on your counter ! I HIGHLY recommend kneading on top of a Silicone Baking Mat, as this dough is quite sticky at first! Using the palms of your hands press the dough down and away from you, and then fold the dough back towards you and press down again with your palms. Turn the dough a quarter of a turn (90 degrees), and do this again. Continue kneading in this manner, with the palms of your hands, until the dough is finally a nice smooth dough ball. This can sometimes take 5-7 minutes (eventually it does get SMOOTH, I promise) ! 🙂 see my recipe video for what the dough should like like when it’s done kneading. Immediately wrap your dough ball tightly in seran/cling wrap, to keep it from drying out (THIS IS IMPORTANT), and let it rest for 15-30 minutes before shaping your pasta.
- SHAPING YOUR PASTA: After your dough has rested, there are MANY options for shaping this pasta dough! You can use Pasta Press (extruder) that attaches to your kitchenaid stand mixer to make shapes like fusili, rigatoni, spaghetti, macaroni, and bucatini (this is MY FAVORITE method because it’s SO easy & versatile!). For this method, I recommend you cut your dough into 8 pieces roll them into oblong balls, and insert 5-6 of the dough balls into the pasta extruder shoot to start mixing. I use a level 4 speed on longer shapes, and a level 2 on shorter shapes that need frequent cutting! make sure you CLEAN excess dough off your wire cutter with your fingers (or a damp papertowel), EACH TIME you cut to ensure smooth edges on each noodle. You can also use a Manual Pasta Roller to make tagliatelle noodles, spaghetti noodles, lasagna sheets, OR just thin pasta dough sheets that you can then manually cut/shape like for: raviolis, pappardelle noodles, farfalle noodles, etc. For this method, I recommend you start by flattening your dough ball into a disc shape, and cutting it into 4 thin, long slices. Work with 1 slice of dough at a time, and make sure you wrap the REST of your dough tightly in cling wrap to keep it from drying out! Roll out your dough piece into long, flat shape thats 4-6 mmm in thickness (or so!). Feed it into your pasta roller on the HIGHEST (thickest) setting it has, and roll it all the way through. Then, continue feeding it into the pasta roller at 1 setting lower (thinner – or down 1 number setting) so it gradually gets one level thinner each time you roll it through, until you reach your desired thickness. I recommend a level 2, the second to thinnest setting (unlike regular pasta dough, you don’t want to go much THICKER than this level, because the texture of your pasta is best at a thinner setting, regardless of what you’re making with it)! You can also use manual, hand-rolling and cutting to make your pasta! For this Method, I recommend using Silicone Baking Mat, a Marble Rolling Pin, and a TINY dusting of Tapioca Flour ! I prefer to, work with 1/3 – 1/2 of the dough at a time (wrap the remaining dough tightly in seran/cling wrap to keep it from drying out!). Directly on your silicone baking mat, flatten it into a rough disc shape, then dust your rolling pin lightly with tapioca flour, AND VERY lightly dust the top of your pasta dough disc (Note: VERY little means using 1/2 a teaspoon or less total, here VERY little flour is needed). By dusting only the TOP of your dough with flour, then your dough sheet will stick just enough to the mat to get traction for rolling, while your rolling pin will NOT stick to your pasta dough as your roll it out! Make sure you pick up your pasta sheet every 2-3 rolls and rotate it. This helps with uniform thickness, AND ensuring it’s not SO stuck to the mat, that you can’t get it off later (TRUST ME ON THIS ONE, it can get stuck to your silicone mat)! Continue rolling until you reach your desired thickness (thinner is better here, remember it expands a little during boiling, so aim for thinner than your final cooked pasta shape!). Use a knife, A Pizza Cutter, and/Or a Fluted Pastry/Cutter, cut your desired shapes! If you’re a perfectionist like me, use an XL Stainless Steel Ruler as a guide!
- After you’ve shaped your noodles, you have two options: boil and eat them fresh (ie. SAME DAY), OR you can dry them out completely and store them in your pantry for months for future use! In either case, the first step is to lay them ALL out flat in a single layer (you can lay them on top of parchment paper, your bare counter, or on top of papertowels!) so that they don’t stick together. If you’re making Long flat noodles (pappardelle, tagliatelle, spaghetti, etc.) you can hang them on a pasta drying rack. or you can also lay these shapes flat as well if you have the counter space for them. Allow them to dry for at least 30 minutes before boiling them if you’re going to eat them same day. If you’re going to dry them completely for storage, then all you need is THE AIR in your house and TIME! Generally, I aim for around 24 hours (depending on humidity and the general air flow in your house) for the pasta to dry COMPLETELY. I like to turn my noodles over every 4-8 hours (or ‘stir them’ around if they’re small shapes like fusili or macaroni, etc)to ensure they dry evenly and ALL the way through! (see: storage tips below for dried pasta)
- COOKING YOUR PASTA: Cook times will vary greatly depending on whether you have fresh pasta, fully dried pasta, and varying depending on thickness & shape! Fresh Pasta should be boiled for ONLY 1.5-2 minutes (with exception to slightly thicker shapes, such as raviolis which take 5 -6 minutes!). Most all of the shapes I tested were perfectly cooked around 1.5 minutes. A good measure of doneness, is that once your freshly made noodles are ALL floating in your boiling water, they’re DONE! Drain IMMEDIATELY (or your noodles get mushy if cooked too long!). Completely DRIED Pasta (ie. at LEAST 24-48 hours after making, AND/OR after storing for long periods of time) should be boiled for 5-6 Minutes. I found that for most dried pasta shapes- 5.5 – 6 minutes was PERFECT, as it gave the tiniest al dente bite to them. Thicker dough may take slightly longer. Do your best to NOT overcook your pasta, or it will seem mushy & make sure to test your noodles as they cook to see when they’re done to your liking! Drain immediately when done!
- STORING DRIED PASTA: The most important thing when storing your dried to pasta, is to MAKE SURE there is NO MORE moisture left in your pasta noodles! If there is any moisture left in them, they will develop mold during storage. You are welcome to leave your noodles out for up to 48 hours to ENSURE they’re completely dried before storing. You can use an XL Ziploc Bag, Food Storage Containers like these, or these AWESOME Stand up Food Grade Food Storage Bags With a Matte Window(which I like the 6.7 X 9.5 inch , so I can keep ONE batch in each bag to calculate the macros). ****I WILL update this post soon with the weight of each serving for dried pastas, to make calculating macros and servings of stored pasta MUCH easier******** store your dried pasta for 2-3 months (possibly much LONGER).
- ENJOY your cooked homemade, keto pasta with a sauce of your choice! Extra pasta that has been cooked (and is either plain or dressed with sauces) will keep in your fridge for up to 5 DAYS! I’ve meal prepped this for lunches, and the cooked noodles ARE just as good on DAY 5 after reheating and eating! They microwave GREAT!
Notes
*Note 1: Adding an additional 1/4 teaspoon of xantham to the recipe can help you get your pasta dough a little thinner, with less breakage, if you are either hand-rolling or using a pasta roller, although this addition is not REQUIRED. Do NOT add extra xantham gum if you’re using a pasta press/extruder, as it will negatively affect the extruder’s shaping (for example: my fusili noodles came out straight & would NOT spiral when I increased the xantham gum). In any case, The extra xantham is TOTALLY optional. I have hand-rolled AND made this dough in the pasta roller without the additional xantham gum with no issues, and STILL achieved a very satisfactory thinness; however, I found it breaks a little less and can stretch just that tad bit thinner if you DO add the 1/4 teaspoon. * PLEASE READ FULL BLOG POST FOR MORE DETAILS. I recommend trying the additional xantham for making: raviolis, tagliatelle, pappardelle, and bow-ties (farfelle), lasagna, potsticker wrappers (although I still need to TRY this idea myself with this dough!), or ANY other shape you want thin or are handcutting (ie, using a rolling pin & a pizza cutter/knife/pastry wheel for manual cutting)! You might even be able to achieve a level 1 thickness (or should I say ‘thin’-ness) when using a manual pasta roller with with the additional xantham gum, although this is tricky when we’re not using gluten! You may have to some experiments for yourself here to see what amount of xantham gum for your shape, method, and desired thickness works best for YOU! Again, see FULL blog post for more details and methods of shaping and making pasta with this dough!
*Note 2: If you forget to leave your eggs out ahead of time to come to room temperature, then NO biggie- try my shortcut! Fill a large cup or bowl with lukewarm water, submerge your eggs in it, and let them rest for 2-5 minutes. TA-DA, your eggs are NOW close to room temperature and can be used immediately in this recipe!!! 🙂
Net Carbs = 5.2 g net carbs Per serving (serving size 1/5th of the recipe) – see weights per serving below. Fresh pasta noodles have a different weight per serving than DRIED pasta (since all the water from the eggs has evaporated out when it’s dried).
1 serving of FRESH lupin flour noodles (ie. 1/5th of the pasta dough ) = 70 grams when weighed. 1 serving of DRIED noodles = 52 grams when weighed. 🙂
PLEASE NOTE: if you’re using a kitchenaid gourmet pasta press (extruder), then the LAST 1/4th of the dough gets stuck inside the press, and you will only get 3- 4 servings with this recipe of pressed noodles! Don’t worry though, you can STILL use the extra dough!!! I pull the excess dough out, and handroll it into additional shapes (personally, I always make Bowties or Tagliatelle with the extra, dry it , and add it to a dried bag of ‘extra’ dough batches’) 🙂 please see post for the different shapes you can make by hand-rolling this with a rolling pin!!!!
If you want a larger portion, split this batch into 4 servings, and it’s still only 6.5 g net carbs (that’s for a large serving of pasta too I might add, which you’ll find is QUITE filling!)
*carbohydrates from ALLULOSE are not counted in the total net carbs, since they don’t affect blood sugar levels (they’re 0 net carbs)! Carb counts vary based on the brands of each item used. My calculations are for the brands listed/suggested (these brands work BEST in this recipe too!)
- Cook Time: 2-6 minutes (see notes)
- Category: pasta
- Method: MULTIPLE!
Nutrition
- Serving Size: 1/5th of Entire Batch (70 grams of fresh noodles or 52 grams of DRIED noodles)
- Calories: 162
- Fat: 7.6 g
- Carbohydrates: 5.2 grams (net carbs)
- Protein: 16.6 grams
Keywords: lupin flour, pasta, gluten-free